Looking for top-quality windows and doors? Get in touch with the team at Arcadia Sash & Door Inc. We’re a local, family owned business with a reputation for providing excellent customer service. Learn more about our products and services below. Contact us today!
A window is glass held in a sash that fits into a frame.
Buying windows is not simple. Whether it's for a new home or an addition, the range of options can be confusing.
The good news is that windows are better than ever. There a wide variety of styles, frames that hardly ever need maintenance, and glazing systems that can slash energy costs. Double-pane insulated glass, heat-resistant coatings, and airtight frames can cut household energy expenditures by as much as 15 percent compared with the leaky single-pane models used in the past.
That improved technology comes at a price. While windows once accounted for 3 to 5 percent of a new home's cost, today 8 to 10 percent is more common.
Here are some pointers to help you cut through the confusion and spend your money wisely.
The style of its windows sets the tone for a house. Punctuate a wall with two symmetrical rows of small, double-hung windows, and it looks Colonial. Fill the same wall with casements, and it is Arts and Crafts. An all-glass wall says contemporary. When choosing a style, it's important to consider the house's architecture, and also the window's locations — certain types work better in some settings than in others.
Double-hung windows are the most popular. Modern versions have a tilt-in sash for easy cleaning of the outside panes. These all-around favorites have some limitations; for example, they're not the best choice in locations where you have to stretch to open them, such as over a kitchen sink.
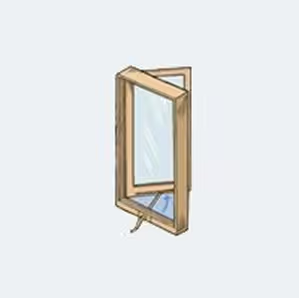
Casement windows are hinged at the side and typically swing out. The full-height opening provides excellent ventilation. But casements, especially those made of wood, can suffer damage if left open in the rain. They're a poor choice where they would open onto patios or other traffic areas.
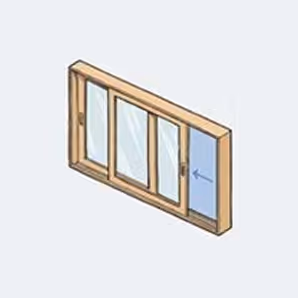
Sliding windows function like double-hungs turned sideways. They look best in contemporary homes, and work well opening onto a deck or exterior stairway, where a casement's swing would cause trouble.
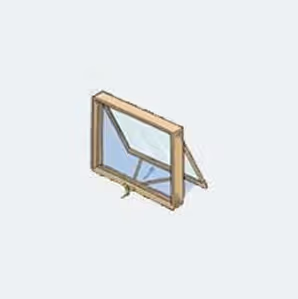
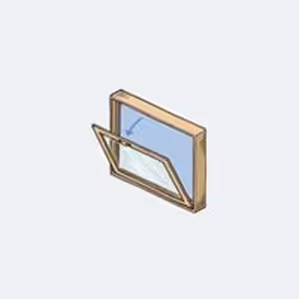
Awning windows are hinged on the top and open out from the bottom. They're often used for ventilation under large, fixed-pane picture windows in contemporary-style homes. They keep out rain even when open, as long as the wind isn't blowing too hard.
Keep Comfort in Mind
What works best on the outside to give your house a sense of scale and visual identity isn't always ideal on the inside, where windows should respond to how rooms are used and the orientation of the house to the sun and wind.
For instance, windows facing east and west accept the very low angle of spring and fall sunlight, which can often be blinding — especially troublesome in a room used for watching television or working on a computer.
For windows on those walls, you will need shades or curtains, or to set the sill more than 4 feet off the floor to reduce glare. Similarly, if you know in which direction the prevailing wind blows, you can increase the amount of operable glass in that area, allowing for more passive ventilation and cutting down on air-conditioning bills.
Today's windows are far superior to their older counterparts in terms of blocking unwanted drafts, but you still need to take into account radiant heating and cooling. No matter how well insulated, large panes of glass will suck heat in winter and invite it in during summer.
For maximum comfort in cold climates, it may be necessary to have large areas of glass directly washed by a heat source, such as convective heat from a radiator or blown heat from a forced-air system (just know that this will raise your heating bill).
On the flip side, the best way to guard against heat gain in warm weather, especially with south-facing windows, is to shade the glass with long overhangs so that the high angle of the sun during summer cannot penetrate deeply into your room. Curtains and shades are another defense.


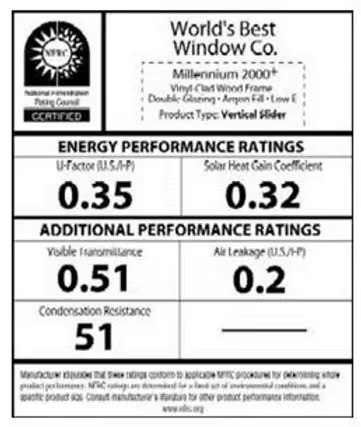
Manufacturers typically submit their windows to tests that follow standards set by the nonprofit National Fenestration Rating Council (NFRC). Their findings, reported on a sticker affixed to most new windows, rate several factors, each expressed as a number. The sample below shows what all the figures actually mean:
(A) U-Factor measures how much heat escapes from a room through the window; the lower the number (usually between 0.20 and 1.20), the better the window's insulating ability. In colder climates, look for 0.35 or lower. Warmer climates can go as high as 0.75.
(B) Solar Heat Gain Coefficient (SHGC) indicates how much heat from the sun the window allows to come into a room, expressed on a scale of 0 to 1. In warmer climates, look for an SHGC lower than 0.4, which means that less than 40 percent of the sun's heat enters a room.
(C) Visible Light Transmittance (VT) measures how much light passes through the window. Anything higher than 0.6 (meaning 60 percent of the light is transmitted) will appear clear to the naked eye. Numbers below 0.5 can significantly darken the view.
(D) Air Leakage (optional) essentially says how drafty a window is, measured in cubic feet of air per square foot of window. A good number is between 0.1 and 0.3, and few manufacturers report this rating unless the window falls into that range.
(E) Condensation Resistance (optional) shows, through a number between 1 and 100, how well a window resists forming condensation (on the inside during cold months, on the outside during a humid summer). The higher the number, the better the window is at resisting condensation.
(F) Design Pressure (Not shown) (optional) is a structural rating that shows how well a window can withstand pressure from wind and rain in pounds per square foot. A large window should rate at least DP-30; 40 or 50 is even better. In hurricane regions they must also have impact glass, which, like a windshield, doesn't shatter. Check codes for local requirements.
A new standard
Cardinal introduces LoĒ³-366 (pronounced low E cubed-366), the ultimate performance glass. It just might make all other low-E glasses obsolete. LoĒ³-366 delivers the ideal balance of solar control and high visibility. And it provides the highest levels of year-round comfort and energy savings, making it the perfect glass no matter where you live. The secret? An unprecedented triple layer of silver. This is beyond ordinary low-E glass; LoĒ³-366 sets the new standard.
Low-E times three makes the difference
Cardinal has for years worked with top-tier window manufacturers by providing energy-efficient LoĒ² glass. Now with three layers of year-round thermal protection, the benefits are exceptional.
The result: a clear coating that blocks even more solar gain than ever before, reflects heat and lets the light stream in. Notice the difference below between clear glass, regular low-E glass and new LoĒ³-366.
Energy savings all year long
The full-year benefits of LoĒ³-366 can be clearly seen. When the temperature soars in the summer, ordinary window glass just can't beat the heat. And tinted glass spoils the view. LoĒ³-366 is formulated to reject solar heat while maintaining attractive visibility. So it keeps the heat out while letting light in. As a matter of fact, LoĒ³-366 glass is our ultimate in performance and clarity among all of Cardinal's clear coated products.
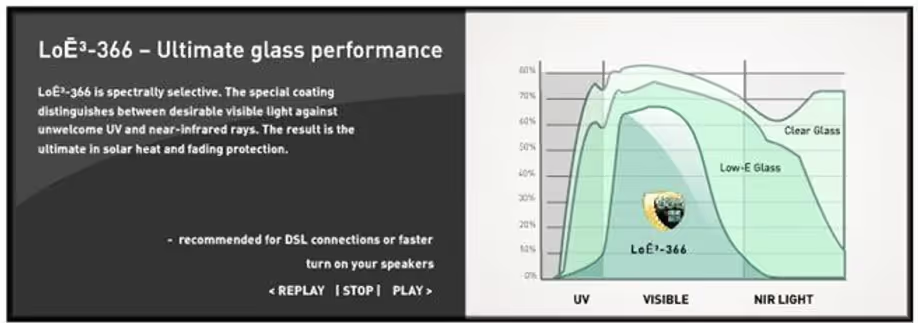
What is more, LoĒ³-366 provides the ultimate in fading protection. It blocks 95% of the sun's damaging ultraviolet rays - a leading cause of fading - so your furniture, carpets, curtains and wall coverings stay beautiful for years.
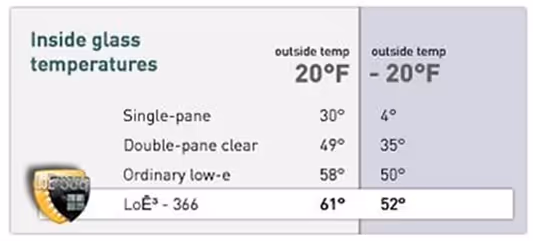
During the cold weather, the insulating effect of your windows has a direct impact on how your rooms feel. The better insulated the window glass, the warmer your room will feel. In fact, the Efficient Windows Collaborative suggests that when glass surface temperature falls below 52°F, there is a risk of thermal discomfort. To maintain the best comfort during the winter, select a glass product that produces surface temperatures that will stay above this point during the coldest outdoor conditions.
According the chart below, the insulating capability of LoĒ³-366 can't be compared to any other glass product. This is a key factor in the construction of comfortable homes. Additionally, the dramatic comfort improvement in windows with warm glass surfaces means the humidity of the indoor air can be controlled and maintained properly. Proper humidity levels will improve comfort and promote a healthier living environment.
Saving money and protecting the environment
According to the Consumer Federation of America, the average American household spends $1,500 per year on energy costs. But energy-efficient windows can help save a bundle. In fact, you can reduce your energy bills by one-third by simply using low-emissivity glass.
But not only does it make financial sense, it's smart to do in view of limited global resources. Conscious consumers are increasingly making purchasing decisions based current environmental realities. By using products that reduce energy consumption, one diminishes their environmental footprint, limiting usage of fossil fuels and lowering carbon emissions.
Code:
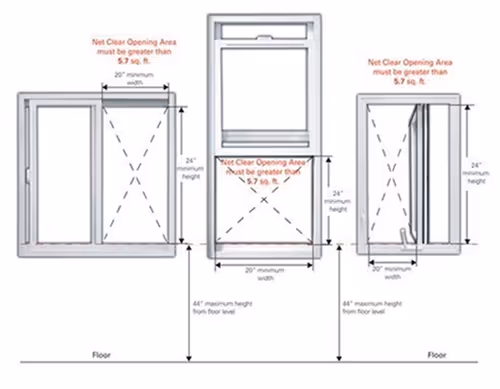
Every sleeping room below the fourth floor shall have at least one openable window or door to the outside to permit emergency exit or rescue. The emergency door or window shall be openable from the inside to provide a full, clear opening without the use of separate tools. Windows shall have a sill height of not more than 44 inches above the floor. Windows shall comply with all the following three conditions:
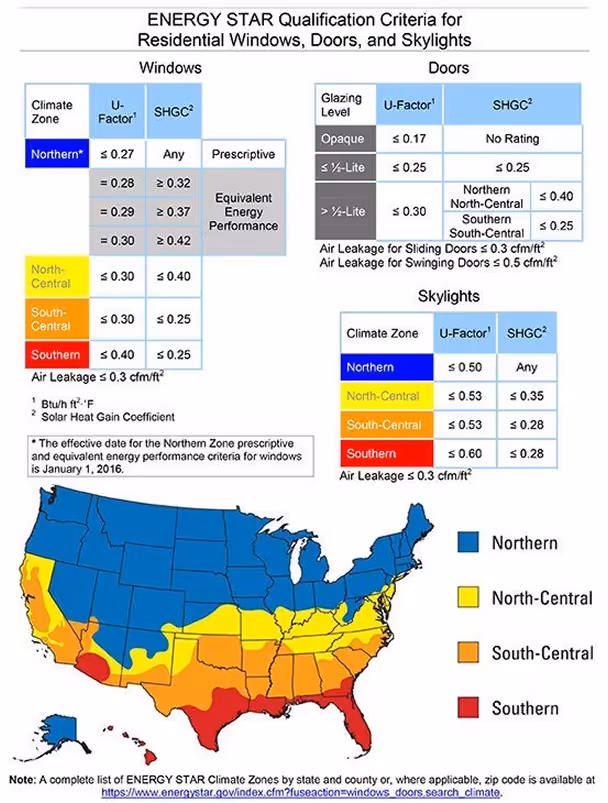
ENERGY STAR qualified windows, doors and skylights reduce energy bills by about 7-24 percent, increase comfort, and come in a variety of shapes and sizes to achieve precisely the look you’re after.
The energy performance of all ENERGY STAR qualified windows, doors, and skylights must be independently tested and certified according to test procedures established by the National Fenestration Rating Council (NFRC).

The NFRC label can be found on all ENERGY STAR qualified windows, doors, and skylights and provides performance ratings in five categories:
For more information on NFRC performance ratings and label, visit NFRC’s Web site. ENERGY STAR qualification is based on U-factor and SHGC ratings only.
Sound Transmission Loss
Sound transmission loss is the reduction in noise level resulting from passage through an obstruction. Sound transmission class (STC) is the measure of the effectiveness of a material to attenuate sound.
The method to determine STC is conducted using two test rooms: a ''source'' room and a ''receiver'' room. The source room will contain a full-range test loudspeaker. The receiver room will contain a microphone, which is connected to sound-measuring devices. There is a nominal opening between the two rooms - usually about 9' wide by 8' high, but can vary in accordance with the standard.
The first step is to measure the sound transmitted from one room into the other through the opening. The sound is measured in decibels (dB) in 1/3-octave bands from 125 Hz to 4000 Hz.
The next step is to ''plug'' the opening with the material or partition construction. This could be a single layer of barrier (such as plywood or SheetBlok), or a complete wall with as many materials, layers, air gaps, etc. that can fit in the opening. The edges are completely sealed and sound transmission between the rooms is measured again.
The sound level from the ''after'' test is subtracted from the sound level ''before'' plugging the opening. The resulting difference is the transmission loss or ''TL.''
Doors are also often weak components of sound insulation and must be properly air sealed to minimize sound leaks. A 45mm (1-3/8") solid core wood door completely sealed with gaskets or weather stripping can achieve an STC rating of 27.
The average single glaze glass window has a STC of 25
Double or triple pane glass and storm windows can all help reduce sound transmission through windows.
Dual Glaze Insulted Glass Window has a average STC of 31
Dual Glaze Insulated Glass using different glass thickness can achieve a STC of 34
Dual Glaze Insulated Glass using different glass thickness and laminated glass can achieve a STC of 36
When ordering an exterior door you will need to answer these questions.
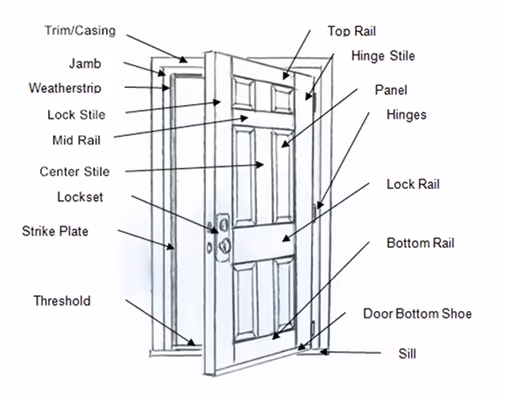
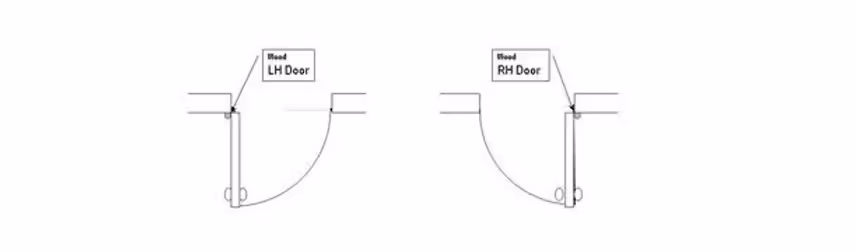
Exterior Doors - As viewed from the outside specify which side the hinge is on.
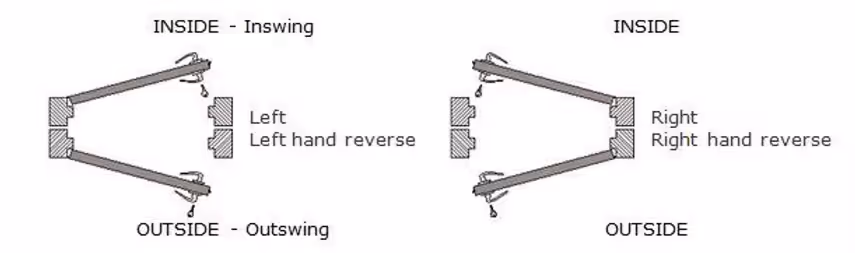
Interior Doors - Specify which side the hinge pin is visible. (note: you can only see from one side)
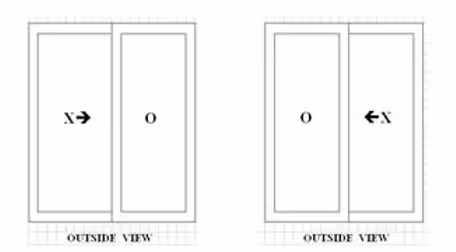
Sliding Doors
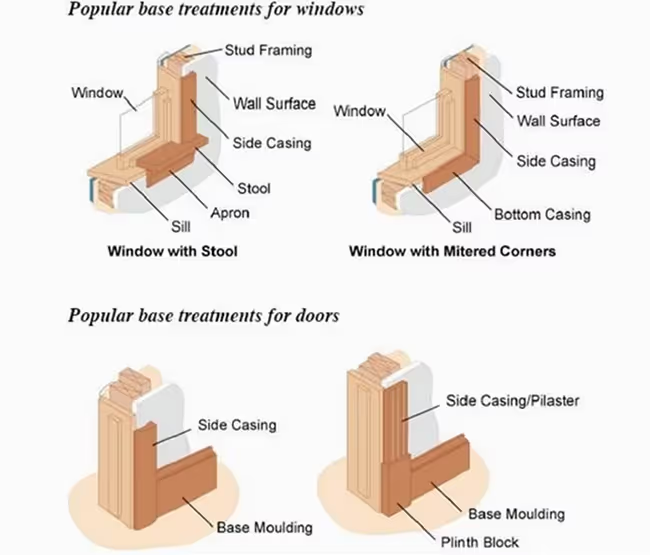
Apron - A trim board that is installed beneath a window stool on the interior.
Astragal - A molding, attached to one of a pair of swinging double doors, against which the other door strikes.
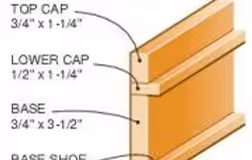
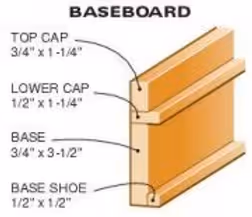
Base - A trim board placed against the wall around the room next to the floor.
Base Cap - A molding used on top of S4S base moulding to add detail.
Base Shoe - Molding used next to the floor on interior base board. Sometimes called a carpet strip.
Brickmould - Trim used around an exterior door jamb that siding butts to. Also comes with groove (stucco key) for use with stucco.
Bull Nose - Rounded corners.
Casing - Wood trim molding installed around a door or window opening.
Chair Rail - Interior trim material installed about 3-4 feet up the wall, horizontally.
Coffered Ceiling - A built-up false beam with decorative crown and other mouldings constructed in squares on the ceiling.
Column - A vertical structural compression member which supports loads.
Column Base - Decorative base moulding installed next to floor on columns.
Column Capital - Decorative component installed on top of columns. Types include: Roman Ionic, Greek Ionic, Roman Corinthian
Corbel - The triangular, decorative and supporting member that holds a mantel or horizontal shelf. Also required on some bay and garden windows for exterior support.
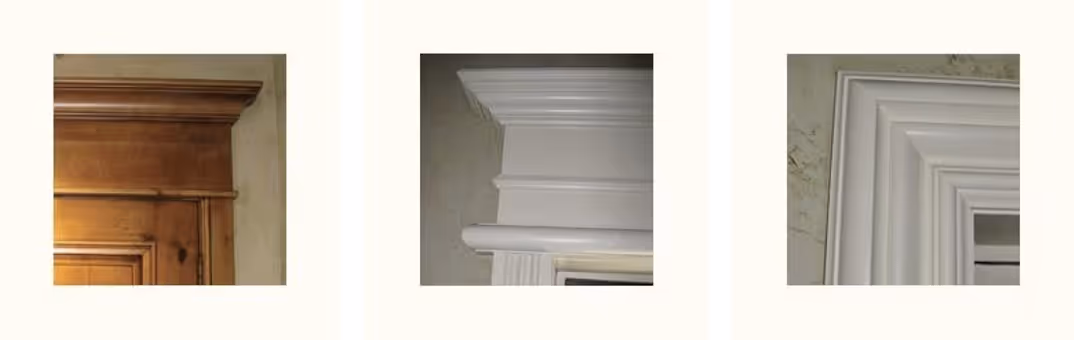
Cornice - A type of crown moulding. Overhang of a pitched roof , usually consisting of a fascia board, a soffit and appropriate trim moldings.
Cove - A molding with a concave face used as trim or to finish interior corners.
Crown - A molding used on cornice or wherever an interior angle is to be covered, especially at the ceiling and wall corner.
Jamb - The side and head lining of a doorway, window, or other opening.
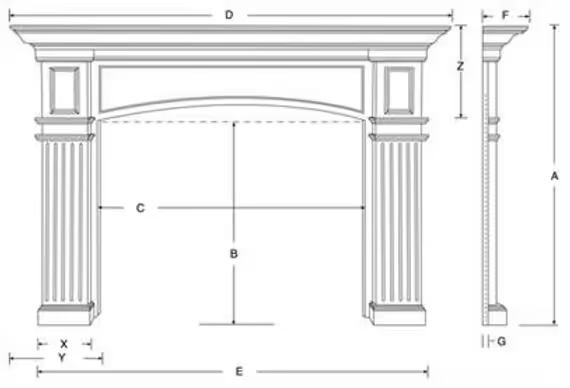
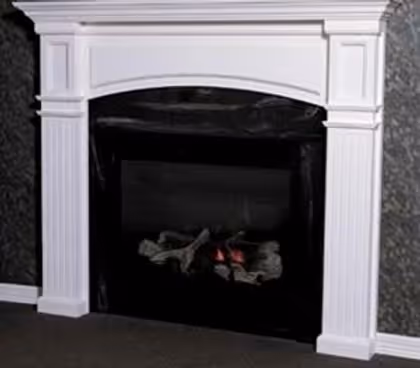
Mantel - The shelf above a fireplace opening. Also used in referring to the decorative trim around a fireplace opening.
Outside Corner - Moulding trim that covers the point at which two walls form an external angle
Panel Cap - Moulding installed on the top edge of wainscot panels.
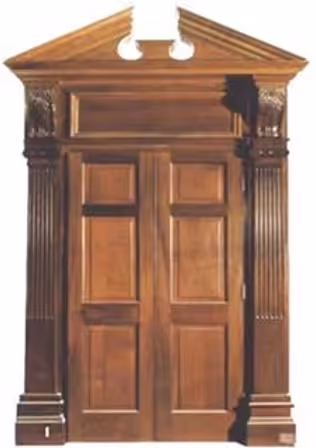
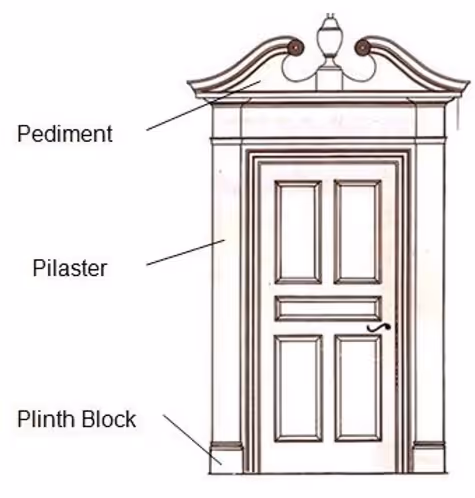
Pediment - Decorative exterior trim assembly installed on top of the exterior of entry doors.
Pilaster - ½ column like decorative trim installed on the sides of exterior doors.
Plinth Block - Decorative base block installed under side casing and next to base moulding. Application is for doors.
Rosette - Decorative trim piece used to add detail to window or door casing.
Round - Round shape moulding.
S4S - Moulding that is rectangular with 90 Deg. angles on all four sides.
Shoe - Moulding installed next to base to cover gap between flooring and base.
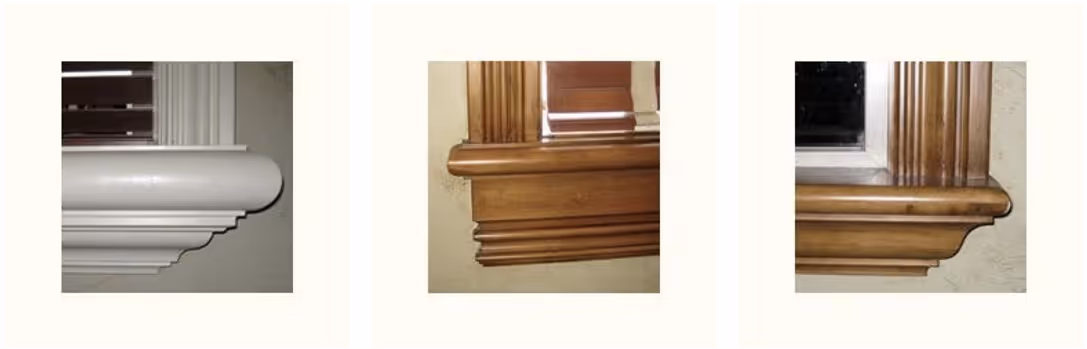
Sill - The structural member forming the lower side of an opening, as a door sill or window sill.
Soffit - The underside where the roof or ceiling overhangs the walls. Usually the underside of an overhanging cornice.
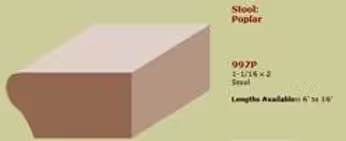
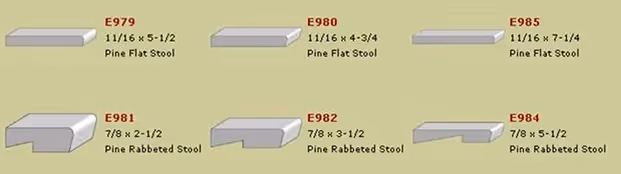
Stool - The interior flat molding fitted over the window sill between jambs and contacting the bottom rail of the lower sash.
Stop - Moldings along the inner edges of a door or window frame.
Stucco mould - Exterior trim with narrow profile and stucco key. Installed around windows and doors.
Threshold - The bottom metal or wood plate of an exterior door frame.
Wainscott - Paneling used as decorative wall covering on lower section of interior walls. A panel cap is installed on the top edge.
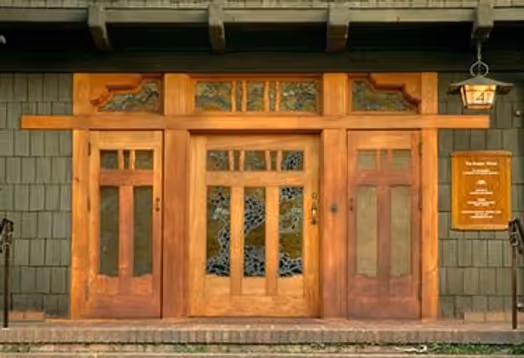
Simplicity is the hallmark of Craftsman-style trim. Although each molding is simple, the combined effect gives the room a distinctive, handcrafted look.

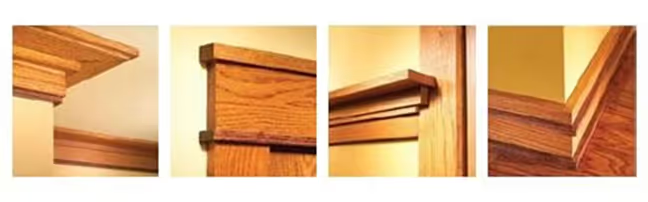

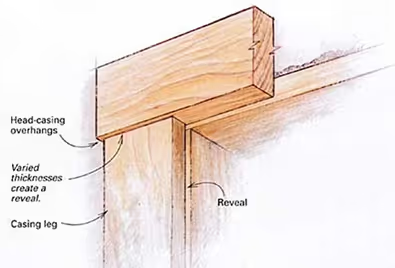
Wood moves — as it dries out, as the house settles, as you cut it and as you're nailing it up. It's almost impossible to get flush edges to stay that way. That's why, for example, carpenters usually step casing back from the edge of door and window jambs. Stepping trim back to form reveals causes shadow lines and creates different planes that make it harder for the eye to pick up discrepancies.
Wood moves, so it's practically impossible to keep flush edges flush. Instead, offset edges from each other, such as the casing from the jamb. And use boards of different thicknesses as with the head casing and the leg shown here. This way, they can swell and shrink unnoticed.
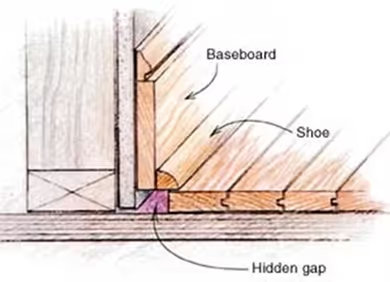
Moldings hide the gap: Floorboards don't have to be a uniform distance from the wall. As long as the base/shoe molding covers it, the gap can vary.
Avoid exposing end grain
Don't show end grain. It absorbs paint and especially stains differently than flat grain. If a piece of molding must end abruptly, cut a return for it.

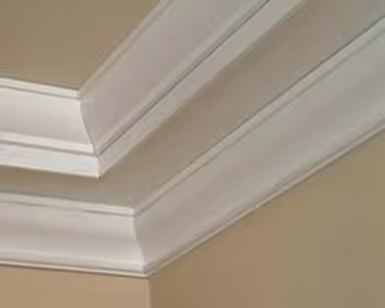
Classical Colonial four piece crown
Tubular Style Latch
The tubular style door latch is a simple lock mechanism that is commonly found on all types of doors. If you are replacing a tubular latch style lock, and the hole has already been cut in your door, the installation is easily accomplished without professional assistance. Before you begin your installation make sure you have ordered a latch with the correct backset length.
Typical bore requirements are:
Bore = 2-1/8” (Optional bore = 1-5/8” )
Backset = 2-3/8” (Optional backset = 2-3/4” )
Dimension between the knob bore and the deadbolt bore
= 5-1/2” (Optional spacing = 3-5/8” )
Entrance Lock - Tubular
Turn or Push Button locking from inside. Key required to unlock from outside.
Unlocked by turning key from outside or turning knob or lever from inside. Can also be unlocked from inside by turning lock.
Entrance Lock - Patio Function
Lock or unlock from inside with thumbturn.
Outside has lever but no key.
Entrance Lock - Mortise
Turn locking from the inside. Can also be locked from the side with a push button.
Key required to unlock from outside.
Unlocked by turning key from outside or turning knob or lever from inside.
Can also be unlocked from inside by turning lock.
Integrated Dead Bolt which is also interconnected. Lock separately from outside.
Interconnection allows both latch and deadbolt to be unlocked from inside by turning knob or lever.
Mortise Style Lockset
The mortise style lock is generally considered more secure than a tubular latch. In addition many mortise style residential locks have locking convenience features. These allow for locking the unit with a push button and without having to use a key. Installation requires that the door be cut into in such a way to allow the mortise box to slide into the door itself. If your door is not currently cut to fit the mortise lock of your choice, you will likely need the assistance of a professional installer to properly cut into your door to custom fit the lock mechanism. Note: not all mortise locks have the same dimensions and before any door is altered careful measurements should be made to make sure the mortise you have chosen will fit properly once your door is modified.
Classroom Lock
Outside locked or unlocked by key. Inside is always unlocked.
Storeroom Lock
Outside knob is fixed and does not turn. Locked or unlocked by key only. Inside is always unlocked.
Passage Latch
Both knobs always unlocked.
Privacy Lock
Push Button Locking from inside. Turning inside knob or lever unlocks.
Can be opening from outside with small pin or screwdriver. (Use for baths or bedrooms)
Dummy Trim
Use as door pull. Does not activate a latch.
Available as Single or ½ Dummy with knob or lever on 1 side only.
Or, as Full Dummy with knob or lever on both sides.
(Use for closets where roller or ball catch in head jamb holds door closed)
Deadbolt - Single Cylinder
Lock or unlock by key from outside. Lock or unlock from inside with thumbturn.
Deadbolt - Double Cylinder
Lock or unlock by key from outside. Lock or unlock from inside requires key.
Deadbolt - Patio Function
Lock or unlock from inside with thumbturn. No lever or key on outside.
A window is glass held in a sash that fits into a frame.
Buying windows is not simple. Whether it's for a new home or an addition, the range of options can be confusing.
The good news is that windows are better than ever. There a wide variety of styles, frames that hardly ever need maintenance, and glazing systems that can slash energy costs. Double-pane insulated glass, heat-resistant coatings, and airtight frames can cut household energy expenditures by as much as 15 percent compared with the leaky single-pane models used in the past.
That improved technology comes at a price. While windows once accounted for 3 to 5 percent of a new home's cost, today 8 to 10 percent is more common.
Here are some pointers to help you cut through the confusion and spend your money wisely.
The style of its windows sets the tone for a house. Punctuate a wall with two symmetrical rows of small, double-hung windows, and it looks Colonial. Fill the same wall with casements, and it is Arts and Crafts. An all-glass wall says contemporary. When choosing a style, it's important to consider the house's architecture, and also the window's locations — certain types work better in some settings than in others.
Double-hung windows are the most popular. Modern versions have a tilt-in sash for easy cleaning of the outside panes. These all-around favorites have some limitations; for example, they're not the best choice in locations where you have to stretch to open them, such as over a kitchen sink.
Casement windows are hinged at the side and typically swing out. The full-height opening provides excellent ventilation. But casements, especially those made of wood, can suffer damage if left open in the rain. They're a poor choice where they would open onto patios or other traffic areas.
Sliding windows function like double-hungs turned sideways. They look best in contemporary homes, and work well opening onto a deck or exterior stairway, where a casement's swing would cause trouble.
Awning windows are hinged on the top and open out from the bottom. They're often used for ventilation under large, fixed-pane picture windows in contemporary-style homes. They keep out rain even when open, as long as the wind isn't blowing too hard.
Keep Comfort in Mind
What works best on the outside to give your house a sense of scale and visual identity isn't always ideal on the inside, where windows should respond to how rooms are used and the orientation of the house to the sun and wind.
For instance, windows facing east and west accept the very low angle of spring and fall sunlight, which can often be blinding — especially troublesome in a room used for watching television or working on a computer.
For windows on those walls, you will need shades or curtains, or to set the sill more than 4 feet off the floor to reduce glare. Similarly, if you know in which direction the prevailing wind blows, you can increase the amount of operable glass in that area, allowing for more passive ventilation and cutting down on air-conditioning bills.
Today's windows are far superior to their older counterparts in terms of blocking unwanted drafts, but you still need to take into account radiant heating and cooling. No matter how well insulated, large panes of glass will suck heat in winter and invite it in during summer.
For maximum comfort in cold climates, it may be necessary to have large areas of glass directly washed by a heat source, such as convective heat from a radiator or blown heat from a forced-air system (just know that this will raise your heating bill).
On the flip side, the best way to guard against heat gain in warm weather, especially with south-facing windows, is to shade the glass with long overhangs so that the high angle of the sun during summer cannot penetrate deeply into your room. Curtains and shades are another defense.
Manufacturers typically submit their windows to tests that follow standards set by the nonprofit National Fenestration Rating Council (NFRC). Their findings, reported on a sticker affixed to most new windows, rate several factors, each expressed as a number. The sample below shows what all the figures actually mean:
(A) U-Factor measures how much heat escapes from a room through the window; the lower the number (usually between 0.20 and 1.20), the better the window's insulating ability. In colder climates, look for 0.35 or lower. Warmer climates can go as high as 0.75.
(B) Solar Heat Gain Coefficient (SHGC) indicates how much heat from the sun the window allows to come into a room, expressed on a scale of 0 to 1. In warmer climates, look for an SHGC lower than 0.4, which means that less than 40 percent of the sun's heat enters a room.
(C) Visible Light Transmittance (VT) measures how much light passes through the window. Anything higher than 0.6 (meaning 60 percent of the light is transmitted) will appear clear to the naked eye. Numbers below 0.5 can significantly darken the view.
(D) Air Leakage (optional) essentially says how drafty a window is, measured in cubic feet of air per square foot of window. A good number is between 0.1 and 0.3, and few manufacturers report this rating unless the window falls into that range.
(E) Condensation Resistance (optional) shows, through a number between 1 and 100, how well a window resists forming condensation (on the inside during cold months, on the outside during a humid summer). The higher the number, the better the window is at resisting condensation.
(F) Design Pressure (Not shown) (optional) is a structural rating that shows how well a window can withstand pressure from wind and rain in pounds per square foot. A large window should rate at least DP-30; 40 or 50 is even better. In hurricane regions they must also have impact glass, which, like a windshield, doesn't shatter. Check codes for local requirements.
A new standard
Cardinal introduces LoĒ³-366 (pronounced low E cubed-366), the ultimate performance glass. It just might make all other low-E glasses obsolete. LoĒ³-366 delivers the ideal balance of solar control and high visibility. And it provides the highest levels of year-round comfort and energy savings, making it the perfect glass no matter where you live. The secret? An unprecedented triple layer of silver. This is beyond ordinary low-E glass; LoĒ³-366 sets the new standard.
Low-E times three makes the difference
Cardinal has for years worked with top-tier window manufacturers by providing energy-efficient LoĒ² glass. Now with three layers of year-round thermal protection, the benefits are exceptional.
The result: a clear coating that blocks even more solar gain than ever before, reflects heat and lets the light stream in. Notice the difference below between clear glass, regular low-E glass and new LoĒ³-366.
Energy savings all year long
The full-year benefits of LoĒ³-366 can be clearly seen. When the temperature soars in the summer, ordinary window glass just can't beat the heat. And tinted glass spoils the view. LoĒ³-366 is formulated to reject solar heat while maintaining attractive visibility. So it keeps the heat out while letting light in. As a matter of fact, LoĒ³-366 glass is our ultimate in performance and clarity among all of Cardinal's clear coated products.
What is more, LoĒ³-366 provides the ultimate in fading protection. It blocks 95% of the sun's damaging ultraviolet rays - a leading cause of fading - so your furniture, carpets, curtains and wall coverings stay beautiful for years.
During the cold weather, the insulating effect of your windows has a direct impact on how your rooms feel. The better insulated the window glass, the warmer your room will feel. In fact, the Efficient Windows Collaborative suggests that when glass surface temperature falls below 52°F, there is a risk of thermal discomfort. To maintain the best comfort during the winter, select a glass product that produces surface temperatures that will stay above this point during the coldest outdoor conditions.
According the chart below, the insulating capability of LoĒ³-366 can't be compared to any other glass product. This is a key factor in the construction of comfortable homes. Additionally, the dramatic comfort improvement in windows with warm glass surfaces means the humidity of the indoor air can be controlled and maintained properly. Proper humidity levels will improve comfort and promote a healthier living environment.
Saving money and protecting the environment
According to the Consumer Federation of America, the average American household spends $1,500 per year on energy costs. But energy-efficient windows can help save a bundle. In fact, you can reduce your energy bills by one-third by simply using low-emissivity glass.
But not only does it make financial sense, it's smart to do in view of limited global resources. Conscious consumers are increasingly making purchasing decisions based current environmental realities. By using products that reduce energy consumption, one diminishes their environmental footprint, limiting usage of fossil fuels and lowering carbon emissions.
Code:
Every sleeping room below the fourth floor shall have at least one openable window or door to the outside to permit emergency exit or rescue. The emergency door or window shall be openable from the inside to provide a full, clear opening without the use of separate tools. Windows shall have a sill height of not more than 44 inches above the floor. Windows shall comply with all the following three conditions:
ENERGY STAR qualified windows, doors and skylights reduce energy bills by about 7-24 percent, increase comfort, and come in a variety of shapes and sizes to achieve precisely the look you’re after.
The energy performance of all ENERGY STAR qualified windows, doors, and skylights must be independently tested and certified according to test procedures established by the National Fenestration Rating Council (NFRC).
The NFRC label can be found on all ENERGY STAR qualified windows, doors, and skylights and provides performance ratings in five categories:
For more information on NFRC performance ratings and label, visit NFRC’s Web site. ENERGY STAR qualification is based on U-factor and SHGC ratings only.
Sound Transmission Loss
Sound transmission loss is the reduction in noise level resulting from passage through an obstruction. Sound transmission class (STC) is the measure of the effectiveness of a material to attenuate sound.
The method to determine STC is conducted using two test rooms: a ''source'' room and a ''receiver'' room. The source room will contain a full-range test loudspeaker. The receiver room will contain a microphone, which is connected to sound-measuring devices. There is a nominal opening between the two rooms - usually about 9' wide by 8' high, but can vary in accordance with the standard.
The first step is to measure the sound transmitted from one room into the other through the opening. The sound is measured in decibels (dB) in 1/3-octave bands from 125 Hz to 4000 Hz.
The next step is to ''plug'' the opening with the material or partition construction. This could be a single layer of barrier (such as plywood or SheetBlok), or a complete wall with as many materials, layers, air gaps, etc. that can fit in the opening. The edges are completely sealed and sound transmission between the rooms is measured again.
The sound level from the ''after'' test is subtracted from the sound level ''before'' plugging the opening. The resulting difference is the transmission loss or ''TL.''
Doors are also often weak components of sound insulation and must be properly air sealed to minimize sound leaks. A 45mm (1-3/8") solid core wood door completely sealed with gaskets or weather stripping can achieve an STC rating of 27.
The average single glaze glass window has a STC of 25
Double or triple pane glass and storm windows can all help reduce sound transmission through windows.
Dual Glaze Insulted Glass Window has a average STC of 31
Dual Glaze Insulated Glass using different glass thickness can achieve a STC of 34
Dual Glaze Insulated Glass using different glass thickness and laminated glass can achieve a STC of 36
When ordering an exterior door you will need to answer these questions.
Exterior Doors - As viewed from the outside specify which side the hinge is on.
Interior Doors - Specify which side the hinge pin is visible. (note: you can only see from one side)
Sliding Doors
Apron - A trim board that is installed beneath a window stool on the interior.
Astragal - A molding, attached to one of a pair of swinging double doors, against which the other door strikes.
Base - A trim board placed against the wall around the room next to the floor.
Base Cap - A molding used on top of S4S base moulding to add detail.
Base Shoe - Molding used next to the floor on interior base board. Sometimes called a carpet strip.
Brickmould - Trim used around an exterior door jamb that siding butts to. Also comes with groove (stucco key) for use with stucco.
Bull Nose - Rounded corners.
Casing - Wood trim molding installed around a door or window opening.
Chair Rail - Interior trim material installed about 3-4 feet up the wall, horizontally.
Coffered Ceiling - A built-up false beam with decorative crown and other mouldings constructed in squares on the ceiling.
Column - A vertical structural compression member which supports loads.
Column Base - Decorative base moulding installed next to floor on columns.
Column Capital - Decorative component installed on top of columns. Types include: Roman Ionic, Greek Ionic, Roman Corinthian
Corbel - The triangular, decorative and supporting member that holds a mantel or horizontal shelf. Also required on some bay and garden windows for exterior support.
Cornice - A type of crown moulding. Overhang of a pitched roof , usually consisting of a fascia board, a soffit and appropriate trim moldings.
Cove - A molding with a concave face used as trim or to finish interior corners.
Crown - A molding used on cornice or wherever an interior angle is to be covered, especially at the ceiling and wall corner.
Jamb - The side and head lining of a doorway, window, or other opening.
Mantel - The shelf above a fireplace opening. Also used in referring to the decorative trim around a fireplace opening.
Outside Corner - Moulding trim that covers the point at which two walls form an external angle
Panel Cap - Moulding installed on the top edge of wainscot panels.
Pediment - Decorative exterior trim assembly installed on top of the exterior of entry doors.
Pilaster - ½ column like decorative trim installed on the sides of exterior doors.
Plinth Block - Decorative base block installed under side casing and next to base moulding. Application is for doors.
Rosette - Decorative trim piece used to add detail to window or door casing.
Round - Round shape moulding.
S4S - Moulding that is rectangular with 90 Deg. angles on all four sides.
Shoe - Moulding installed next to base to cover gap between flooring and base.
Sill - The structural member forming the lower side of an opening, as a door sill or window sill.
Soffit - The underside where the roof or ceiling overhangs the walls. Usually the underside of an overhanging cornice.
Stool - The interior flat molding fitted over the window sill between jambs and contacting the bottom rail of the lower sash.
Stop - Moldings along the inner edges of a door or window frame.
Stucco mould - Exterior trim with narrow profile and stucco key. Installed around windows and doors.
Threshold - The bottom metal or wood plate of an exterior door frame.
Wainscott - Paneling used as decorative wall covering on lower section of interior walls. A panel cap is installed on the top edge.
Simplicity is the hallmark of Craftsman-style trim. Although each molding is simple, the combined effect gives the room a distinctive, handcrafted look.
Wood moves — as it dries out, as the house settles, as you cut it and as you're nailing it up. It's almost impossible to get flush edges to stay that way. That's why, for example, carpenters usually step casing back from the edge of door and window jambs. Stepping trim back to form reveals causes shadow lines and creates different planes that make it harder for the eye to pick up discrepancies.
Wood moves, so it's practically impossible to keep flush edges flush. Instead, offset edges from each other, such as the casing from the jamb. And use boards of different thicknesses as with the head casing and the leg shown here. This way, they can swell and shrink unnoticed.
Moldings hide the gap: Floorboards don't have to be a uniform distance from the wall. As long as the base/shoe molding covers it, the gap can vary.
Avoid exposing end grain
Don't show end grain. It absorbs paint and especially stains differently than flat grain. If a piece of molding must end abruptly, cut a return for it.
Classical Colonial four piece crown
Tubular Style Latch
The tubular style door latch is a simple lock mechanism that is commonly found on all types of doors. If you are replacing a tubular latch style lock, and the hole has already been cut in your door, the installation is easily accomplished without professional assistance. Before you begin your installation make sure you have ordered a latch with the correct backset length.
Typical bore requirements are:
Bore = 2-1/8” (Optional bore = 1-5/8” )
Backset = 2-3/8” (Optional backset = 2-3/4” )
Dimension between the knob bore and the deadbolt bore
= 5-1/2” (Optional spacing = 3-5/8” )
Entrance Lock - Tubular
Turn or Push Button locking from inside. Key required to unlock from outside.
Unlocked by turning key from outside or turning knob or lever from inside. Can also be unlocked from inside by turning lock.
Entrance Lock - Patio Function
Lock or unlock from inside with thumbturn.
Outside has lever but no key.
Entrance Lock - Mortise
Turn locking from the inside. Can also be locked from the side with a push button.
Key required to unlock from outside.
Unlocked by turning key from outside or turning knob or lever from inside.
Can also be unlocked from inside by turning lock.
Integrated Dead Bolt which is also interconnected. Lock separately from outside.
Interconnection allows both latch and deadbolt to be unlocked from inside by turning knob or lever.
Mortise Style Lockset
The mortise style lock is generally considered more secure than a tubular latch. In addition many mortise style residential locks have locking convenience features. These allow for locking the unit with a push button and without having to use a key. Installation requires that the door be cut into in such a way to allow the mortise box to slide into the door itself. If your door is not currently cut to fit the mortise lock of your choice, you will likely need the assistance of a professional installer to properly cut into your door to custom fit the lock mechanism. Note: not all mortise locks have the same dimensions and before any door is altered careful measurements should be made to make sure the mortise you have chosen will fit properly once your door is modified.
Classroom Lock
Outside locked or unlocked by key. Inside is always unlocked.
Storeroom Lock
Outside knob is fixed and does not turn. Locked or unlocked by key only. Inside is always unlocked.
Passage Latch
Both knobs always unlocked.
Privacy Lock
Push Button Locking from inside. Turning inside knob or lever unlocks.
Can be opening from outside with small pin or screwdriver. (Use for baths or bedrooms)
Dummy Trim
Use as door pull. Does not activate a latch.
Available as Single or ½ Dummy with knob or lever on 1 side only.
Or, as Full Dummy with knob or lever on both sides.
(Use for closets where roller or ball catch in head jamb holds door closed)
Deadbolt - Single Cylinder
Lock or unlock by key from outside. Lock or unlock from inside with thumbturn.
Deadbolt - Double Cylinder
Lock or unlock by key from outside. Lock or unlock from inside requires key.
Deadbolt - Patio Function
Lock or unlock from inside with thumbturn. No lever or key on outside.
